Introduction
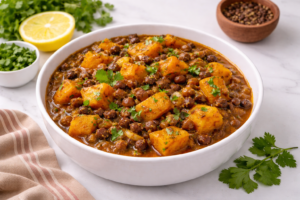
In many Indian homes, biryani isn’t just food — it’s an event. The aroma slowly filling the kitchen, family members peeking into the pot, someone asking “ready hua kya?” every five minutes… pure joy. Among all regional varieties, malabar chicken biryani holds a special place. Originating from Kerala’s Malabar coast, this biryani is lighter than Hyderabadi versions but incredibly fragrant and rich in flavour.
What makes it unique is the use of short-grain aromatic rice, gentle spices, fried onions, nuts, and a subtle sweetness from raisins. It feels festive without being heavy. Perfect for Sunday lunch, special guests, or even when you simply want to treat yourself after a long week.
This recipe is designed for Indian home kitchens — no complicated restaurant techniques, just honest cooking that delivers beautiful results every time.
Table of Contents
Calories & Nutritional Information (Per Serving)
- Calories: ~520 kcal
- Protein: ~28 g
- Carbohydrates: ~58 g
- Fat: ~18 g
- Fiber: ~3 g
Values are approximate and depend on oil, ghee, and portion size.
Health Benefits
Despite being a festive dish, this biryani can be part of a balanced meal.
- Chicken provides lean protein for energy and muscle health
- Whole spices like elaichi and dalchini support digestion
- Onions add antioxidants and natural sweetness
- Curd marinade helps tenderise chicken and adds probiotics
- Coconut oil (traditional choice) contains beneficial fats
When eaten in moderate portions with salad, it feels satisfying without heaviness.
Ingredients Required
For Chicken Marination
- 750 g chicken (curry cut)
- 1 cup thick curd (dahi)
- 1½ tbsp ginger-garlic paste
- ½ tsp haldi
- 1 tsp red chilli powder
- 1 tsp coriander powder
- Salt to taste
- Juice of ½ lemon
- 1 tbsp coconut oil or regular oil
For Rice
- 2 cups jeerakasala rice (Malabar biryani rice)
Substitute: basmati rice if unavailable - 3½ cups water
- 1 bay leaf
- 3 green cardamoms
- 1 small cinnamon stick
- 2 cloves
- Salt to taste
For Biryani Masala
- 3 tbsp coconut oil or ghee
- 3 large onions, thinly sliced
- 2 tomatoes, chopped
- 3 green chillies, slit
- 1 tsp ginger paste
- ½ tsp garam masala
- Handful fresh coriander leaves
- Handful mint leaves
For Garnish
- 2 tbsp ghee
- 12–15 cashews
- 2 tbsp raisins
Step-by-Step Recipe Method (Detailed & Beginner-Friendly)
Step 1: Marinate the Chicken
In a large bowl, combine chicken with curd, ginger-garlic paste, haldi, chilli powder, coriander powder, salt, lemon juice, and oil.
Mix thoroughly so every piece is coated well.
Cover and rest for at least 1 hour (overnight in fridge gives best flavour).
Tip: Bring marinated chicken to room temperature before cooking.
Step 2: Wash & Soak Rice
Rinse rice gently until water runs mostly clear. Soak for 20–30 minutes.
This helps grains cook evenly and stay fluffy.
Step 3: Cook the Rice
Boil water in a large pot with salt and whole spices. Add soaked rice.
Cook until rice is 90% done — grains should be firm, not mushy.
Drain immediately and spread on a plate to stop cooking.
Step 4: Fry Onions
Heat coconut oil or ghee in a heavy kadhai or handi.
Add sliced onions and cook patiently on medium flame until deep golden.
Remove half of these fried onions for later garnish.
Step 5: Prepare Biryani Masala
To the remaining onions, add ginger paste and green chillies. Sauté briefly.
Add chopped tomatoes and cook until soft and slightly jammy.
Add garam masala, coriander leaves, and mint leaves. Mix well.
The kitchen will smell incredible at this stage.
Step 6: Cook the Chicken
Add marinated chicken along with all marinade.
Cook on medium flame, stirring occasionally, until chicken is fully cooked and oil starts separating.
Do not add too much water — gravy should be thick.
Tip: If liquid is excessive, cook uncovered for a few minutes.
Step 7: Fry Nuts & Raisins
In a small pan, heat ghee. Fry cashews until golden, then add raisins until they puff up.
Set aside.
Step 8: Layer the Biryani
Now comes the exciting part.
In the same handi with chicken:
- Spread half the cooked rice evenly
- Sprinkle fried onions, nuts, raisins, coriander, mint
- Add remaining rice
- Top again with fried onions and ghee
Step 9: Dum Cooking
Cover the pot tightly. You can seal edges with dough for authentic dum.
Cook on very low flame for 20 minutes.
Alternatively, place the pot on a tawa to prevent burning.
Let it rest for another 10 minutes before opening.
Step 10: Serve
Gently fluff from the sides without mixing too aggressively.
Each spoonful should contain rice and chicken together.
Pro Tips, Variations & Substitutes
Restaurant-Style Tips
- Use jeerakasala rice for authentic Malabar flavour
- Coconut oil gives traditional aroma
- Slow dum cooking is key — don’t rush
Healthy Options
- Reduce ghee and oil
- Use skinless chicken
- Add more herbs for freshness
Regional Variations
- Some Kerala homes add a splash of rose water
- North Malabar versions use more fried onions
- A few recipes include boiled eggs as garnish
Serving Suggestions
This biryani is a complete meal but pairs beautifully with simple sides.
Traditional Kerala Style
- Onion raita
- Lemon pickle
- Pappadam
Other Options
- Cucumber salad
- Boiled egg
- Light veg curry
- Lunchbox meal for office
Perfect for festivals, family gatherings, or weekend indulgence.
Storage & Shelf Life
- Refrigerator: Keeps well for 2 days
- Freezer: Up to 1 month (store in portions)
- Reheating: Steam or microwave with a sprinkle of water
Tip: Avoid reheating repeatedly to maintain texture.
Frequently Asked Questions (FAQs)
Traditionally, jeerakasala (kaima) rice is used. Basmati can be substituted if unavailable.
Overcooking or too much water can make rice sticky. Cook only 90% before layering
Yes. It will still taste good, but dum cooking enhances aroma and texture.
It is moderately spiced but not very hot. Adjust chillies as per preference.
You can cook chicken masala in cooker, but final layering should be done in a separate pot.
Yes, but bone-in chicken gives deeper flavour and juicier results.
Printable Recipe Card
Prep Time: 20 minutes
Cook Time: 50 minutes
Total Time: 1 hour 10 minutes
Servings: 4–5
Difficulty Level: Medium
Final Thoughts
Malabar chicken biryani is one of those dishes that instantly makes any meal feel special. It doesn’t rely on heavy spices or overpowering heat — instead, it wins hearts with fragrance, balance, and comforting richness. Once you try making it at home, you’ll realise it’s far less intimidating than it seems.
If you cook this recipe, I’d truly love to hear how it turned out. Did your family ask for seconds? Did the aroma bring neighbours to the kitchen door? Share your experience, rate the recipe, and pass it on to someone who loves biryani as much as we do.
Happy cooking and enjoy every delicious bite ❤️